Notes

PS4 HEN Test

I got to do some game testing on my firmware 4.55 PS4 last night. I acquired a couple PKG files to test with and used my ESP8266 to enabled HEN. I copied over the PKG files to a ExFAT formatted USB drive and plugged it into the PS4. I then went to Settings>Debug Settings>Game>Package Installer and installed all packages.

Excuse the crappy photo of the TV

I am now FINALLY able to play PT. All the packages I installed worked without issues except Burnout Paradise Remastered since its needs firmware 5.05 to run.

Side note: I own all the retail games I installed/tested from PKG’s, just thought I should add that. PT is only a demo obviously.

ESP8266 & The PS4

There has been a bunch of development with the PS4 homebrew scene the last 2 weeks. The PS4’s Homebrew Enabler (HEN) is removed every time the PS4 is restarted and needs to be reapplied. There is was to do it from internet, local PC, smartphones and from a ESP8266 device. I found the ESP8266 to be the most consistent way of applying the HEN to the PS4.

I picked up the ESP8266 from Amazon for just under $9.

What you will need:
PS4 on firmware 5.05 or lower. (I am curently on 4.55 myself. I am waiting for 5.05 HEN/MIRA to be more stable before it update)
ESP8266 with 4mb flash, linked above
MicroUSB cable
ESP-Host found at Github
ESPTool

Here was my install process on a Windows 10 machine:

  • Install Python 2.7 Get it here
  • Put Python and scripts in your PATH (c:\Python27;c:\Python27\Scripts) Google it if you are unsure how to do this
  • Download get-pip.py and run “python get-pip.py” from a CMD promt
  • Once Python and PIP are installed, open a CMD window and run “pip install esptool”
  • Download ESP-host BIN file that matches your PS4 firmware (esphostmulti455.bin in my case)
  • Plug in your ESP8266 to your computer VIA the MicroUSB cable
  • Open a CMD windows and run “python esptool.py –port COM3 write_flash 0x00000 esphostmulti455.bin” Use your full path to your esphostmulti455.bin file

Once flash is done, plug the ESP8266 into a USB port on your PS4 and go to Settings>Network>Setup Internet Connection>Use Wifi>Easy
Connect to the SSID PS4-WIFI (If you do not see the PS4-WIFI network then your ESP8266 is not working properly.
To run the exploit go to Settings>User’s Guide
Select HEN or HEN+VR and you will be notified when the script is complete.

Update: nodemcu-pyflasher – This tool might be better for flashing since python & PIP are not needed.

XBox One Internal HDD Upgrade

A few days ago I picked up a used Xbox One. This is the first Xbox One I have own since I have been a Sony PS4 guy since launch. I got excited and picked up some of the Xbox exclusives that I missed over the past few years. I quickly learned that the internal 500GB was not going to be enough to install the 10-15 games I picked up. I know I can throw an external HDD on it without issues but I am not a fan of putting an external HDD on a system that has an internal HDD that can be upgraded. After some Googling around I found it its possible without too much trouble. Here is what I did…

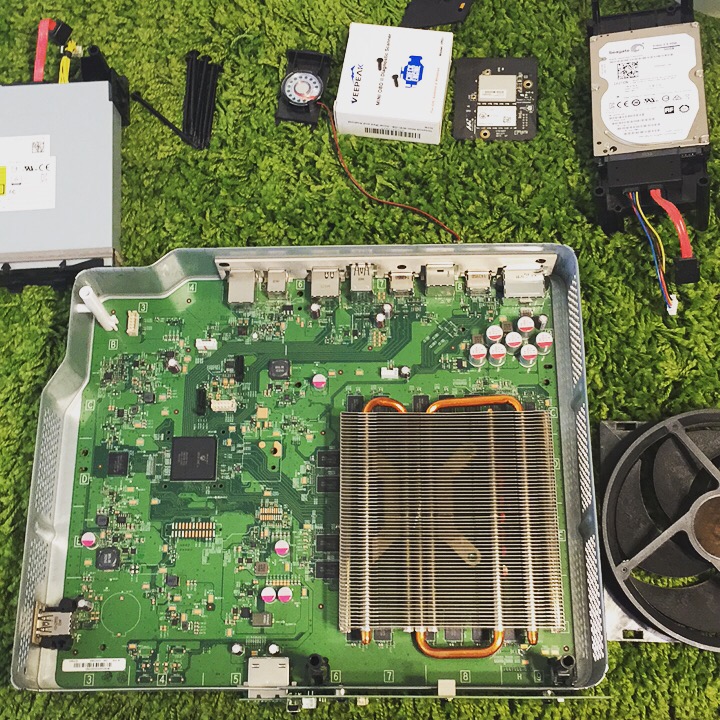
Removed the original HDD (Make sure to label it with a sticky note or something so it does not get mixed up with all your other loose dives laying around.. what? You don’t have that problem?)

Used a SATA to USB connector, I hooked up the original Xbox One HDD to my PC/laptop and copied the X:\ contents to a safe spot to use later. (Should be 2 folders named A & B and 1 file in the root) I placed mine at C:\XBOX\OLDHDD\X\

I bought a Seagate Slim external 2TB and removed it from the enclosure and hooked it up to my PC/laptop.

Download the XBOX One Drive Replacement Preparation Script (Created by xFix) and Extract to C:\XBOX

Open a command prompt “as administrator” and type C:\XBOX\xboxonehdd-master\win\create_xbox_drive.bat

Follow the onscreen prompts

When the script is done close the command window and copy the contents from C:\XBOX\OLDHDD\X\ to the newly created X:\

Slap the HDD back in the Xbox One and boot it up.

Update your CEX/DEX PS3 CFW

These are notes for me since I only do this 1 or 2 times a year and I always forget the process.

Download PUP
USB key root
Make folder PS3
Make folder PS3\UPDATE
Change the name of the downloaded PUP to PS3UPDAT.PUP and place it on the USB in the UPDATE folder.
Plug in USB key to your PS3
Go to Settings / System Update / Update VIA Storage Media
The Following update was found:
Version XXXX (Make sure this is the version you want to install)
Press OK
Accept User Agreement
Press Start

Battery replacement list

Nintendo 64 Cart Memory Battery:
CR2032

Nintendo Game Boy Advance Cart Battery:
CR1616

Nintendo Game Boy Cart Battery:
CR2025

Nintendo Game Boy Color Cart Battery:
CR2025

Nintendo SNES Cart Memory Battery:
CR2032

Nintendo NES Cart Memory Battery:
CR2032

Nintendo Game Cube Memory Battery:
CR2032

Sega Saturn:
CR2032

Sega Dreamcast:
2032 or LR2030 (NOT a CR2032 as it is not rechargeable)

Sega Dreamcast VMU:
CR2038 (Takes two of them)

SEGA CD Model 2 RAM Battery:
CR2016


I will add more as I think of them.

Playstation Vita VPK Notes

How to install the UPDATES:

1. Install game vpk
2. Copy update zip contents to the game folder
3. Make a GameTitleIDfolder in ux0:Patch/ folder in vitashell (ex: ux0:Patch/PCSE00000)
4. Copy the update zip contents to the new folder you just created in ux0:Patch/
5. Start the game, now it should not say to update your game and should detect the latest version.

How to install the DLC:

Copy the ADDCONT_PLAIN folder into root of ux0 for each item you want! e.g ux0:/addcont_plain/PCSE00000/*

Errors:

0XFFFFFF means low storage.

Playstation / PSOne Mods

I had a few Playstation/PSOne systems laying around that would benefit to having a good old stealth chip. I started looking into the current status of mod chips for the Playstation and it all seems pretty much open sourced not. All the HEX dumps of the major chips are available online and they can be used with a simple $2 PIC. This is just some information I found and will be using this as a spot for notes as I mod a couple Playstation systems.

Available code:

MultiMode (MM)
Mayumi
ONEChip
Stealth
ModAVR
Anti-Piracy Mod
Old Crow
Many others/variations of the above.

What code for what system?

Fat SCPH-100x = Stealth 2.8a
Fat SCPH-500x-900x = MM3
Slim PSOne 10x = MM3 (PAL model SCPH-102 which should use ONEChip) , Mayumi v5.1

What PIC should I use?

There are actually a few that are proven to work well. I went with SMD ICs since they have a smaller footprint and I always bend or trim the legs on the through hole ones anyways.

12C508
12C508A
12C509
12C509A
12F508

I will most likely go with the 12F508 due to cost. I will use the PicKit2 to program the 12F508.


RGH Xbox 360 Dash update Notes

Here are some quick notes from my dashboard update on my RGH Xbox 360

I am upgrading to dashboard 17489 which is the latest as of today.

Software needed:

  • Simple 360 NAND Flasher
  • xeBuild GUI

Lets do it:

  • Fist put the Simple 360 NAND Flasher on a USB key and run it on your Xbox from XEXMenu.
  • Backup your existing NAND (It will make a file called flashdmp.bin).
  • Open the flashdmp.bin in xeBuild GUI.
  • Make sure to have your CPU Key handy.
  • Make sure the latest dashboard is selected (17489) as of today.
  • Create update NAND (updflash.bin).
  • Copy updflash.bin to USB in the Simple 360 NAND Flasher folder.
  • Use USB in Xbox and run Simple 360 NAND Flasher again.
  • This time it will ask if you want to update the NAND since it detected the updflash.bin file.
  • System will reboot on its own. Check and make sure the dashboard updated.